.svg)

Προγραμματισμός
.jpg)
Radzivon Alkhovik
Λάτρης της αυτοματοποίησης χαμηλού κώδικα
12 Αυγούστου 2024
.jpg)
Email remains a powerful tool for businesses to connect with their audience, promote products, and drive engagement. Mailchimp, a leading email marketing platform, empowers businesses of all sizes to create and send impactful email campaigns. The true potential of Mailchimp lies in its robust API (Application Programming Interface), which allows developers to integrate Mailchimp functionality into their own applications, automate tasks, and build custom solutions tailored to their unique needs.
Whether you're a developer looking to build a seamless integration with Mailchimp or a marketer aiming to streamline email marketing efforts, understanding the Mailchimp API is crucial. This comprehensive guide delves into the essentials of the Mailchimp API, exploring its key features, usage, best practices, and real-world use cases. By the end of this guide, you'll have a solid foundation to harness the power of the Mailchimp API and elevate your email marketing strategies.
Key Takeaways: The Mailchimp API offers powerful integration capabilities, allowing you to sync subscriber data, trigger campaigns, and build custom dashboards. Key aspects include understanding RESTful architecture, managing API keys, configuring webhooks for real-time notifications, adhering to rate limits, and exploring various use cases to enhance your email marketing efforts.
At its core, the Mailchimp API is a set of protocols and tools that allow developers to programmatically interact with Mailchimp's platform. It provides a way to access and manipulate data, automate tasks, and extend the functionality of Mailchimp beyond its web interface. The Mailchimp API follows the principles of a RESTful architecture, which means it uses standard HTTP methods like GET, POST, PUT, and DELETE to communicate between the client (your application) and the server (Mailchimp).
REST, short for Representational State Transfer, is a popular architectural style for designing networked applications. It relies on a stateless, client-server communication protocol, typically HTTP, and treats every request as an independent transaction. This approach allows for scalability, simplicity, and flexibility in API design.
The Mailchimp API adheres to these RESTful conventions, providing a intuitive and consistent way to interact with Mailchimp's resources, such as audiences, campaigns, automations, and more. By leveraging the power of the Mailchimp API, developers can build robust integrations, automate repetitive tasks, and create custom workflows that align perfectly with their business requirements.
The Mailchimp API offers a comprehensive set of endpoints and resources that allow you to interact with virtually every aspect of your Mailchimp account. Whether you want to manage your audience, create and send campaigns, set up automations, or retrieve reporting data, the API has you covered.
One of the fundamental tasks in email marketing is managing your audience, also known as your subscriber list. The Mailchimp API provides endpoints for creating, updating, and retrieving information about your audiences. You can use the API to add new subscribers, update their profiles, segment your audience based on specific criteria, and more.
Crafting and sending email campaigns is at the heart of Mailchimp's functionality. With the Mailchimp API, you can automate the process of creating and sending campaigns. You can programmatically create campaigns, set their content and design, schedule them for delivery, and track their performance.
Mailchimp's automation features allow you to create targeted, trigger-based email sequences that nurture your subscribers and drive engagement. The API enables you to set up and manage these automations programmatically. You can define triggers, create automation workflows, and monitor their performance, all through the power of the API.
The Mailchimp API opens up opportunities for seamless integration with other platforms and tools. Whether you want to sync subscriber data with your CRM, connect to your e-commerce platform to send abandoned cart emails, or integrate with your website's forms and pop-ups, the API provides the necessary endpoints and webhooks to make it happen.
Measuring the success of your email marketing efforts is crucial for optimizing your strategy and making data-driven decisions. The Mailchimp API allows you to retrieve detailed reporting data, including campaign metrics, subscriber engagement, e-commerce data, and more. You can use this data to build custom reporting dashboards or integrate it with your analytics tools.
It's important to note that Mailchimp regularly updates its API to introduce new features, improvements, and deprecations. The current version of the Mailchimp Marketing API is 3.0, which is the recommended version to use. Previous versions, such as 2.0, have been deprecated and are no longer supported. To ensure your integrations remain compatible and secure, it's crucial to stay informed about API updates and migrate to the latest version when necessary.

The Mailchimp API provides developers with a powerful tool to integrate Mailchimp's functionality into their own applications. With Latenode, you can set up sophisticated workflows that leverage the Mailchimp API for various tasks, such as managing subscriber lists, automating campaign sending, retrieving analytics data, and more. This guide will walk you through how to obtain a Mailchimp API key and automate Mailchimp data management using Latenode.
Imagine automatically managing your Mailchimp subscribers, updating their profiles, and segmenting your audience based on specific criteria. With Latenode, this becomes a reality. Our platform ensures that subscriber data is collected from the right sources, processed, and stored accurately, allowing you to focus on analyzing results rather than manually managing lists.
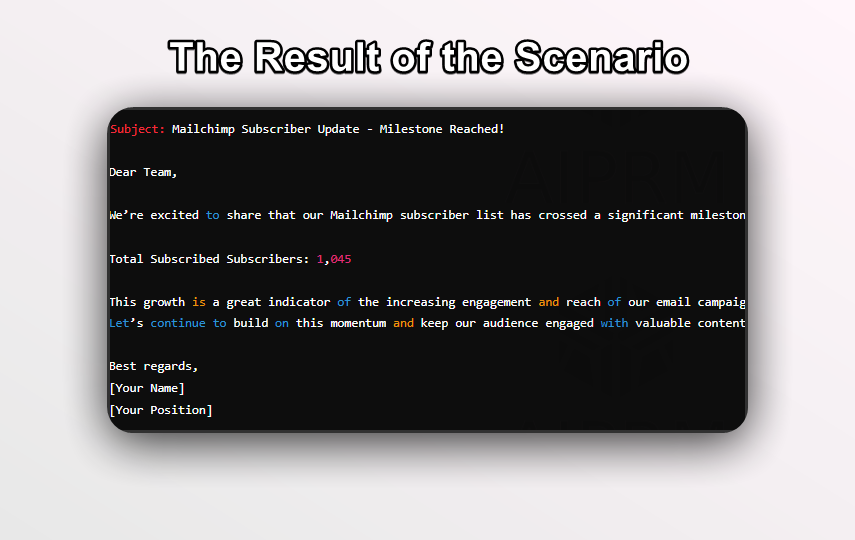
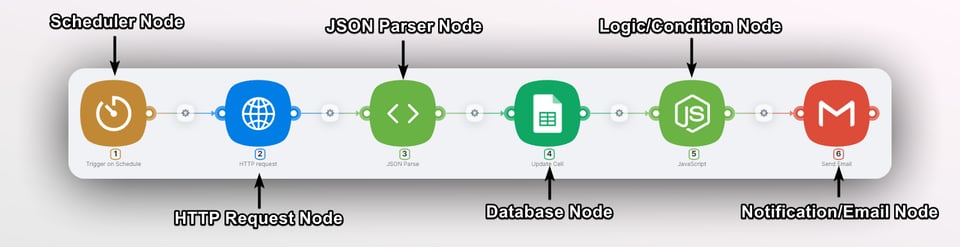
This workflow can be visually represented in Latenode's interface, with connected nodes representing each step of the process, from data collection to analysis and storage.
By leveraging Latenode's visual workflow builder and seamless integration with the Mailchimp API, you can easily design and implement complex automation scenarios, increasing data management efficiency and accelerating your email marketing strategies.
If you need help or advice on how to create your own script or if you want to replicate this one, contact our community, where low-code automation experts are available to assist you.
To start using the Mailchimp API, the first step is to obtain an API key. An API key is a unique identifier that authenticates and authorizes your application to make requests to the Mailchimp API on behalf of your account. It acts as a secure password, ensuring that only authorized applications can access your Mailchimp data.
API keys play a crucial role in maintaining the security and integrity of your Mailchimp account. They serve as a gateway to your account, granting access to sensitive data and functionality. Therefore, it's essential to treat your API key with the same level of confidentiality as you would with your account password.
When you generate an API key, Mailchimp assigns specific permissions and access levels to that key. These permissions determine what actions the key can perform and what data it can access. By using different API keys for different applications of integrations, you can granularly control access to your Mailchimp account and minimize the risk of unauthorized access.
To generate your Mailchimp API key, follow these step-by-step instructions:


Congratulations! You now have your Mailchimp API key, which you can use to authenticate your API requests and start interacting with your Mailchimp account programmatically.
To ensure the security and proper usage of your API key, follow these best practices:
Treat your API key like a password and never share it publicly. Avoid including it in client-side code or exposing it in public repositories. If you suspect that your API key has been compromised, generate a new key immediately and revoke the old one.
If you have multiple applications or integrations that require access to your Mailchimp account, create separate API keys for each one. This allows you to manage and revoke access on a granular level, minimizing the impact of any potential security breaches.
As a security precaution, it's a good practice to periodically rotate your API keys. This means generating new keys and updating your applications to use the new keys while revoking the old ones. Regular key rotation reduces the risk of unauthorized access if a key is compromised without your knowledge.
When storing or transmitting your API key, ensure that you use secure methods. Encrypt sensitive data at rest and use HTTPS for secure communication between your application and Mailchimp's servers. Avoid storing API keys in plain text or in version control systems.
By following these best practices, you can safeguard your Mailchimp account and ensure that your API integrations remain secure and reliable.
Webhooks are a powerful feature of the Mailchimp API that allow you to receive real-time notifications when specific events occur within your Mailchimp account. Instead of constantly polling the API for updates, webhooks enable Mailchimp to proactively send data to your application whenever relevant events are triggered.
A webhook is essentially an HTTP POST request that Mailchimp sends to a URL you specify, known as the webhook URL or callback URL. When an event that you have subscribed to occurs, Mailchimp collects the relevant data and sends it as the payload of the POST request to your designated URL.
Webhooks operate on an event-driven model, meaning that your application can react and respond to specific events as they happen in real-time. This eliminates the need for constant API polling and allows for more efficient and responsive integrations.
Mailchimp supports a wide range of webhook event types that cover various aspects of your email marketing activities. Some common event types include:
By subscribing to the relevant webhook events, you can build reactive and event-driven integrations that respond to specific actions or triggers in your Mailchimp account.
To set up webhooks in Mailchimp, follow these general steps:
Mailchimp provides detailed documentation and guides on setting up webhooks, including information on the required data format, authentication mechanisms, and best practices for handling webhook requests securely.
When working with webhooks, consider the following best practices:
By leveraging webhooks effectively, you can build powerful and responsive integrations that react to events in real-time, enabling you to automate workflows, trigger actions, and keep your application in sync with your Mailchimp account.
Like most APIs, the Mailchimp API imposes certain rate limits and usage restrictions to ensure fair usage, maintain system stability, and protect against abuse. Understanding these limitations is crucial for building reliable and efficient integrations that respect Mailchimp's terms of service.
The Mailchimp API allows a maximum of 10 simultaneous connections per user. This means that at any given time, your application can have up to 10 active requests being processed by Mailchimp's servers. If you exceed this limit, subsequent requests will be throttled and may result in a 429 (Too Many Requests) error response.
To stay within the concurrent connections limit, it's important to design your integration in a way that efficiently manages API requests. Avoid making excessive or unnecessary requests, and consider implementing techniques like request queueing, rate limiting, and exponential backoff to handle throttling gracefully.
Mailchimp enforces a timeout of 120 seconds for API requests. If a request takes longer than 120 seconds to complete, it will be terminated, and you will receive a timeout error response. This limitation ensures that long-running requests don't tie up server resources indefinitely.
To accommodate longer-running operations or large data transfers, consider using Mailchimp's Batch API endpoints. The Batch API allows you to submit multiple operations in a single request, which can be processed asynchronously by Mailchimp's servers. This approach helps optimize performance and reduces the chances of hitting timeout limits.
In addition to the concurrent connections limit, Mailchimp may throttle API requests if they exceed certain usage thresholds or if the system is experiencing high load. When throttling occurs, you may receive HTTP 429 (Too Many Requests) or 403 (Forbidden) error responses.
To handle throttling and other API errors gracefully, implement proper error handling and retry mechanisms in your integration. Monitor the response status codes and headers, and follow Mailchimp's guidance on retry intervals and exponential backoff strategies. By implementing robust error handling, you can ensure that your integration can recover from temporary failures and maintain a reliable connection to the Mailchimp API.
To optimize your usage of the Mailchimp API and minimize the risk of hitting rate limits or other limitations, consider the following best practices:
By being mindful of rate limits, implementing proper error handling, and following best practices for API usage, you can build robust and efficient integrations that make the most of the Mailchimp API while respecting its limitations.
The Mailchimp API opens up a wide range of possibilities for businesses to enhance their email marketing efforts and streamline their workflows. Let's explore some practical use cases that demonstrate the power and versatility of the Mailchimp API.
One common use case for the Mailchimp API is syncing subscriber data between your application or CRM and your Mailchimp account. By leveraging the API, you can automatically add new subscribers, update their profiles, and keep your Mailchimp audience in sync with your other systems.
For example, if you have a user registration process on your website, you can use the Mailchimp API to automatically add new users to your Mailchimp audience. This eliminates the need for manual data entry and ensures that your email list stays up to date with your user base.
Similarly, if you have a CRM system that stores customer information, you can use the API to sync that data with Mailchimp. This allows you to segment your audience based on customer attributes, personalize your email campaigns, and maintain a unified view of your customer interactions.
Another powerful use case for the Mailchimp API is automating the process of creating and sending email campaigns. Instead of manually designing and scheduling campaigns through the Mailchimp web interface, you can use the API to programmatically create and send campaigns based on specific triggers or schedules.
For instance, you can build an integration that automatically generates and sends a welcome email series to new subscribers as soon as they sign up. Or, you can set up an automated campaign that sends personalized product recommendations based on a customer's purchase history or browsing behavior.
By automating campaign creation and sending, you can save time, reduce manual effort, and ensure that your email communications are timely and relevant to your subscribers.
If you run an online store, integrating your e-commerce platform with Mailchimp using the API can unlock powerful marketing opportunities. You can sync your product catalog, customer data, and order information with Mailchimp to create targeted email campaigns and automate customer journeys.
For example, you can use the Mailchimp API to automatically send abandoned cart emails to customers who have added items to their cart but haven't completed the purchase. These reminder emails can include personalized product recommendations, limited-time offers, or incentives to encourage customers to complete their purchase.
Additionally, you can use the API to segment your customers based on their purchase history, total spend, or product preferences. This allows you to create targeted email campaigns that promote relevant products, offer exclusive discounts, or cross-sell complementary items.
The Mailchimp API provides access to a wealth of data and metrics related to your email campaigns, subscriber engagement, and e-commerce performance. By leveraging this data, you can build custom reporting dashboards that give you a comprehensive view of your email marketing efforts.
Using the API, you can retrieve campaign metrics such as open rates, click-through rates, bounces, and unsubscribes. You can also access subscriber data, including growth trends, demographics, and engagement levels. Additionally, you can pull e-commerce data like revenue, order count, and average order value.
By integrating this data into your own reporting dashboards or analytics tools, you can gain valuable insights into the performance of your email campaigns, identify areas for improvement, and make data-driven decisions to optimize your marketing strategy.
The Mailchimp API allows you to create custom signup forms and pop-ups that seamlessly integrate with your website or application. Instead of using Mailchimp's default forms, you can design and develop forms that match your brand's look and feel and capture the specific subscriber data you require.
By using the API, you can automatically sync the data captured through your custom forms with your Mailchimp audience. This ensures that new subscribers are added to your email list in real-time, without the need for manual data import or export.
Additionally, you can use the API to trigger specific actions or automations based on form submissions. For example, you can send a welcome email, add subscribers to a specific group or segment, or trigger a custom workflow based on the data provided in the form.
The Mailchimp API enables seamless integration with a wide range of other tools and services, allowing you to create powerful workflows and automate data synchronization.
For instance, you can integrate Mailchimp with your customer support or helpdesk system to automatically add new support tickets or customer inquiries to your email list. This allows you to send targeted follow-up emails, gather feedback, or provide personalized support based on the customer's interaction history.
You can also integrate Mailchimp with your social media platforms to sync subscriber data, track social media engagement, or trigger email campaigns based on social media interactions.
By leveraging the Mailchimp API to integrate with other tools and services, you can create a cohesive and interconnected marketing ecosystem that drives efficiency, personalization, and customer engagement.
These are just a few examples of the many use cases for the Mailchimp API. The possibilities are vast, and the specific applications will depend on your business needs, marketing goals, and the tools and platforms you use. By exploring the capabilities of the Mailchimp API and thinking creatively about how it can enhance your email marketing efforts, you can unlock new opportunities for growth and success.
Now that you have a solid understanding of what the Mailchimp API is, how it works, and the various use cases it enables, let's dive into the practical steps you need to take to get started with using the API.
The first step in getting started with the Mailchimp API is to obtain your API key. As mentioned earlier, an API key is a unique identifier that authenticates and authorizes your application to make requests to the Mailchimp API on behalf of your account.
To generate your API key, log in to your Mailchimp account and navigate to the API keys section in your account settings. Follow the steps outlined in the "Mailchimp API Key" section of this guide to create a new API key and store it securely.
The Mailchimp API is language-agnostic, which means you can interact with it using any programming language that supports making HTTP requests. However, Mailchimp provides official client libraries for several popular programming languages to simplify the process of making API requests and handling responses.
Some of the supported programming languages include:
Choose the programming language that you are most comfortable with and that aligns with your development stack. Once you have selected your language, install the corresponding Mailchimp client library using the package manager specific to your language.
For example, if you are using Python, you can install the official Mailchimp client library using pip:
Refer to the Mailchimp API documentation for detailed instructions on installing and using the client library for your chosen programming language.
Mailchimp provides comprehensive documentation for its API, which serves as a valuable resource for developers. The API documentation includes detailed information about the available endpoints, request and response formats, authentication requirements, and code examples.
Take some time to explore the Mailchimp API documentation and familiarize yourself with the different sections and resources available. The documentation is organized into categories such as Campaigns, Lists, Reports, and more, making it easy to navigate and find the information you need.
Pay special attention to the authentication requirements, rate limits, and best practices outlined in the documentation. Understanding these guidelines will help you build robust and efficient integrations that adhere to Mailchimp's usage policies.
Once you have obtained your API key, installed the necessary client library, and explored the API documentation, you are ready to make your first API request.
Here's a simple example using Python to retrieve information about your Mailchimp account:
Replace 'YOUR_API_KEY' with your actual Mailchimp API key. This code snippet retrieves your username and email address associated with your Mailchimp account.
Experiment with different endpoints and parameters to explore the capabilities of the Mailchimp API. Start with simple requests like retrieving account information, listing your audiences, or fetching campaign data. As you become more comfortable with the API, you can move on to more complex operations like creating campaigns, managing subscribers, or setting up automations.
When working with the Mailchimp API, it's important to test your integration thoroughly and handle errors gracefully. Use tools like Postman or cURL to manually test API requests and inspect the responses. This allows you to validate the request structure, headers, and parameters before integrating them into your application.
Mailchimp provides detailed error messages and status codes in the API responses to help you diagnose and troubleshoot issues. Make sure to log and handle errors appropriately in your code, providing meaningful error messages to users when necessary.
Additionally, consider using a staging or test environment when building your integration. This allows you to safely test your code without affecting your production Mailchimp account or sending unintended emails to your subscribers.
Once you have thoroughly tested your Mailchimp API integration and ensured its reliability and performance, you can deploy it to your production environment. Consider the following best practices when deploying your integration:
By following these best practices and staying informed about updates and changes to the Mailchimp API, you can ensure that your integration remains stable, secure, and compliant over time.
Congratulations! You have reached the end of this comprehensive guide on the Mailchimp API. By now, you should have a solid understanding of what the Mailchimp API is, how it works, and the incredible opportunities it presents for enhancing your email marketing efforts.
Throughout this guide, we have explored the key concepts and features of the Mailchimp API, including its RESTful architecture, authentication using API keys, webhooks for real-time notifications, rate limits and best practices, and various use cases that demonstrate its versatility and power.
We have also walked through the practical steps of getting started with the Mailchimp API, from obtaining your API key and installing client libraries to making your first API request and testing your integration.
Armed with this knowledge, you are now well-equipped to harness the full potential of the Mailchimp API and take your email marketing to new heights. Whether you are a developer looking to build custom integrations or a marketer seeking to automate and streamline your workflows, the Mailchimp API provides the tools and flexibility to achieve your goals.
As you embark on your journey with the Mailchimp API, remember to explore the official Mailchimp API documentation for detailed references, code examples, and best practices. Stay up to date with the latest API updates and announcements, and engage with the Mailchimp developer community to learn from others and share your own experiences.
The possibilities with the Mailchimp API are endless, and the only limit is your imagination. So go forth, experiment, and build amazing integrations that elevate your email marketing strategies and delight your subscribers.
Happy coding and happy marketing!
The Mailchimp Marketing API is designed for managing your email marketing campaigns, subscribers, and automations. It provides endpoints for creating and sending campaigns, managing audiences, and retrieving reporting data. On the other hand, the Mailchimp Transactional API is specifically designed for sending transactional emails, such as order confirmations, password resets, or account notifications. Transactional emails are typically triggered by specific events or actions and are sent to individual recipients rather than bulk campaigns.
No, you can use the Mailchimp API with a free account. However, keep in mind that certain features and endpoints may have limitations or require a paid plan. For example, advanced segmentation, comparative reporting, and some automation features are only available on paid plans. Make sure to review the pricing and feature comparison on the Mailchimp website to understand the limitations and requirements for your specific use case.
When making requests to the Mailchimp API, it's important to handle errors and exceptions gracefully in your code. Mailchimp returns standard HTTP status codes and error responses to indicate the success or failure of an API request. Make sure to check the status code of the response and handle specific error cases accordingly. Mailchimp provides detailed error messages in the response body, which can help you diagnose and troubleshoot issues. Implement proper error logging and provide meaningful error messages to users when necessary. Additionally, consider implementing retry mechanisms with exponential backoff for transient errors, such as rate limit exceeded or temporary network failures.
Yes, you can use the Mailchimp API to import subscribers into your Mailchimp audiences. Mailchimp provides a Batch API endpoint specifically designed for importing large numbers of subscribers efficiently. You can prepare your subscriber data in the required format (JSON or CSV) and make a POST request to the Batch API endpoint. Mailchimp will process the import asynchronously and provide a status endpoint to track the progress of the import. Make sure to review the guidelines and best practices for importing subscribers, such as obtaining proper consent, handling opt-in preferences, and maintaining data quality.
Mailchimp regularly updates its API to introduce new features, improvements, and bug fixes. The frequency of updates may vary, but Mailchimp typically releases new versions of the API every few months. It's important to stay informed about API updates and changelog announcements to ensure that your integration remains compatible and takes advantage of the latest features and enhancements. Mailchimp provides a dedicated API changelog where you can find detailed information about recent updates, deprecations, and breaking changes. Make sure to subscribe to the Mailchimp API mailing list or follow their developer blog to stay up to date with the latest API news and announcements.


.jpg)
.jpg)
.png)